E-Invoice is available for supplier purchase orders only. E-Invoice is completely paperless and reduces the procurement cycle time by eliminating physical mail. Participation is highly encouraged and provides the following supplier benefits:
- Faster, more reliable invoice submittal
- Faster payment, reduced cycle time
- Online payment status availability
- Security of invoice and payment detail
- Ability to get paid early with optional Dynamic Discount Payment Terms
E-Invoice facilitates Sandia’s mission to provide efficient stewardship of taxpayer resources. Sandia also encourages use of paperless processing by using Electronic Funds Transfer (EFT) payments.
Suppliers need to have an iSupplier portal username and password to submit invoices electronically. Usernames and passwords are typically established upon the supplier’s completion of their iSupplier portal registration. If the supplier does not have a user account established or needs password or login assistance, email supreg@sandia.gov to request access. Multiple user accounts can be established for each supplier.
Step-by-Step Instructions
The four tabs below include step-by-step instructions for the various functions you can complete within the portal.
1. Go to iSupplier Portal
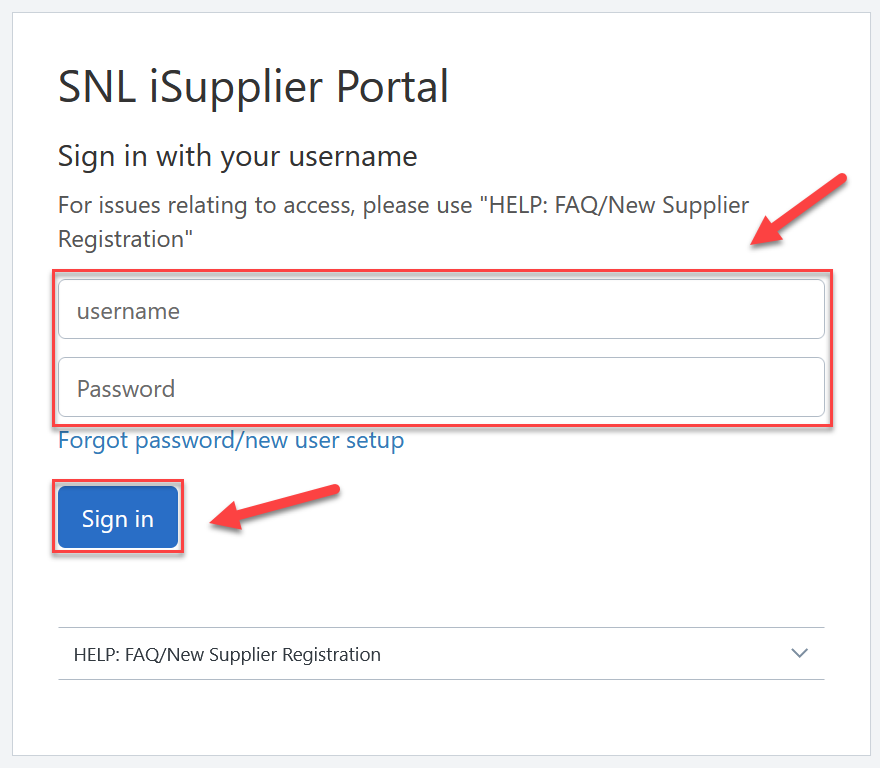
2. Enter your username and Password, then click Sign in.
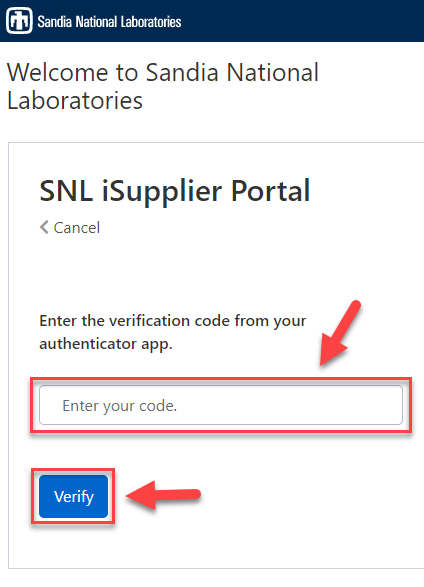
3. Enter your verification code, then click Verify. If this is your first time logging in with multi-factor authentication (MFA), see our iSupplier MFA Help Guide.
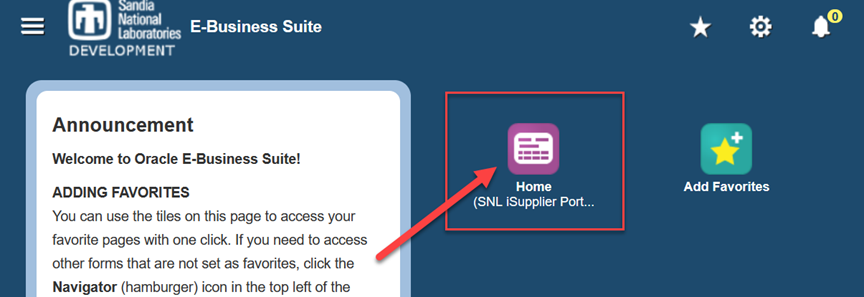
4. After logging in, select the SNL iSupplier Portal icon to access the portal.
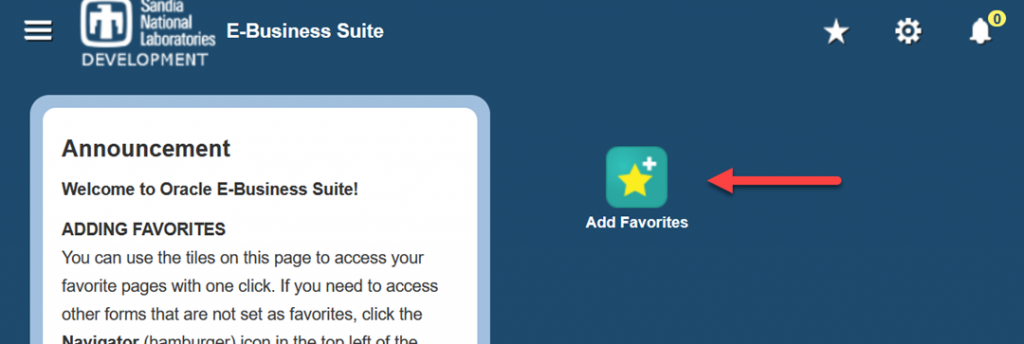
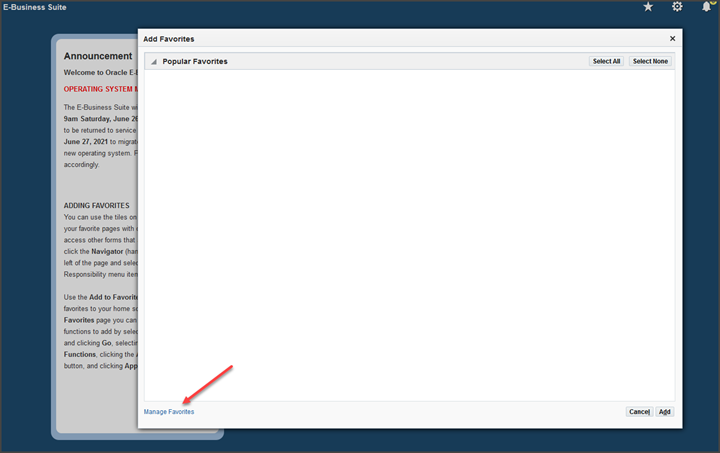
1. From the main E-Business Suite page, click the ‘Add to Favorites’ icon:
2. Click on ‘Manage Favorites’ at the bottom of the next screen:
3. In the ‘Responsibility’ dropdown field in the ‘Manage Favorites’ section, select “SNL iSupplier Portal for Suppliers” and click ‘Go’:


4. Check the box next to the ‘Home’ function prompt and click “Add to Favorites”:

5. Ensure the “Home (SNL iSupplier Portal for Suppliers)” responsibility is in your ‘Favorites’ section and click ‘Apply’ to get back to the main E-Business Suite page:

6. From the main E-Business Suite page, click the ‘Home’ icon to navigate to the main “Supplier Collaboration” webpage:

7. You should now be on the main “Supplier Collaboration” home page. To continue creating your E-Invoice, refer to the Create Invoice tab.
To avoid system errors, it is important that you do not use your internet browser’s “Back” button to navigate between screens while in the iSupplier Portal.
Some search functions utilize popup windows; please ensure your browser has popups enabled.
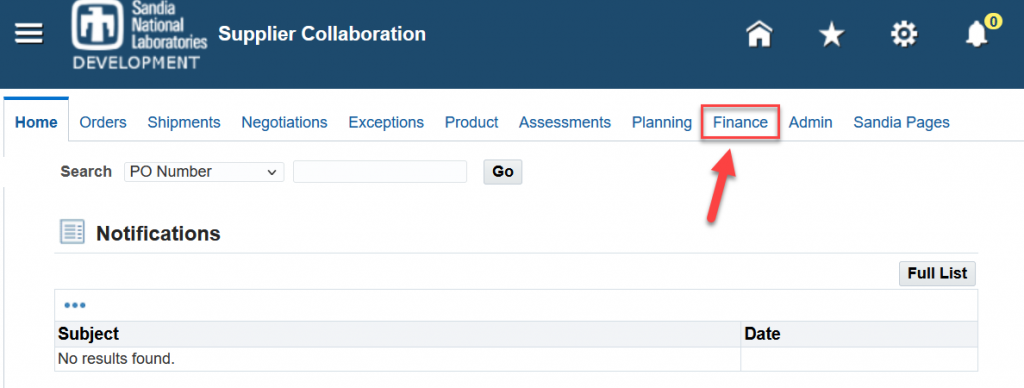
1. To create an invoice, click on the ‘Finance’ tab from the Home screen:
2. Click ‘Create Invoice’ (right side of screen):

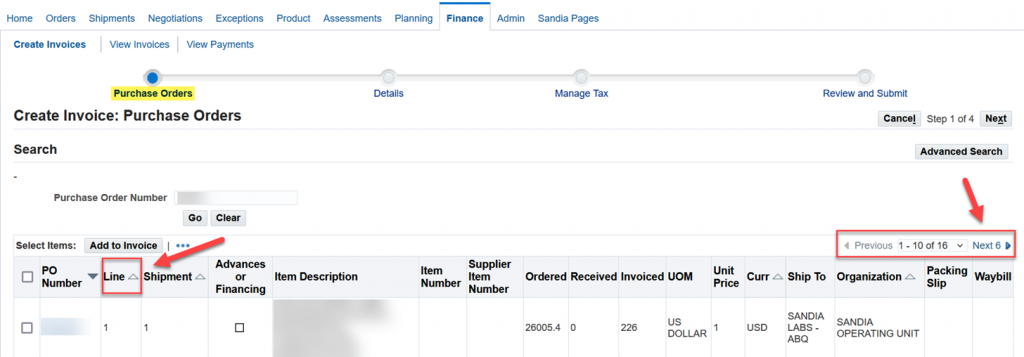
1. Enter Purchase Order Number, then click ‘Go’.

2. PO lines appear in the table at the bottom of the screen. The max number of PO lines shown at a time is 10 lines. If your PO has >10 PO lines, click ‘Next #’ to reveal additional PO lines to select.
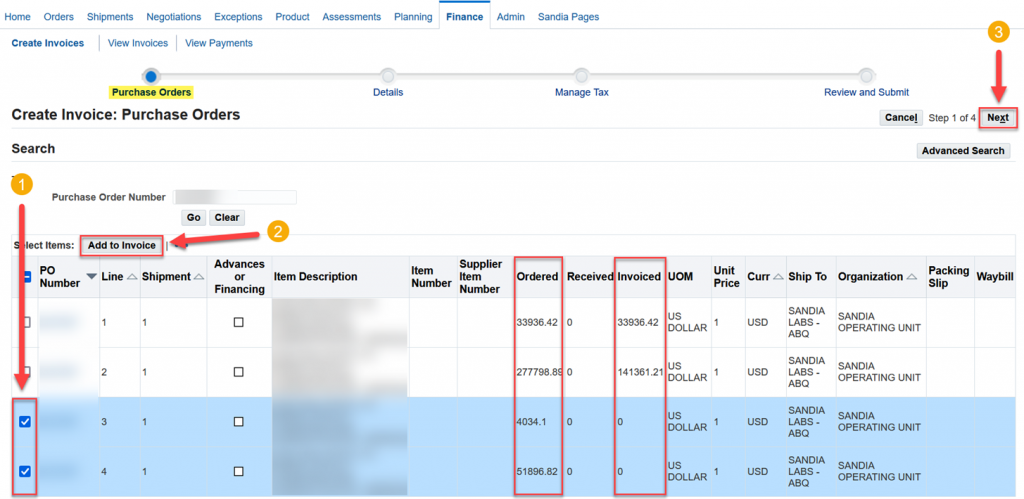
3. Compare ‘Invoiced’ and ‘Ordered’ quantities to determine which PO line has available unbilled quantities to bill against. If the ‘Invoiced’ and ‘Ordered’ quantities are the same, the PO line is fully billed and you will not be able to apply a billed quantity to it in Step 2 of 4.
Select Line(s) for billing by checking the box to the left of the PO Line(s), then click ‘Add to Invoice’. The PO Line(s) added will display at the bottom of the screen. If you are not sure which Line to bill, contact your buyer.
Once you have added your invoice Line(s), press ‘Next’ to proceed to the next step.
For this Step, see below for detailed instructions related to reference fields 1: ![]() through 9:
through 9: ![]() . Proceed through the following fields in order. DO NOT input data in any other fields or you may get an error message.
. Proceed through the following fields in order. DO NOT input data in any other fields or you may get an error message.

![]() 1: Remit To
1: Remit To
This value will pre-populate with the address associated with your PO. Please review and change the remit to site if needed.
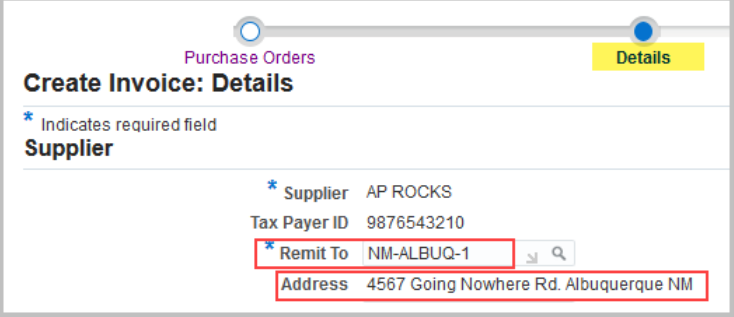
To select a different remit to/address, delete the information in the Remit To field, input “%” then click on the magnifying glass. This will query a list of remit to sites and addresses associated with your supplier record.
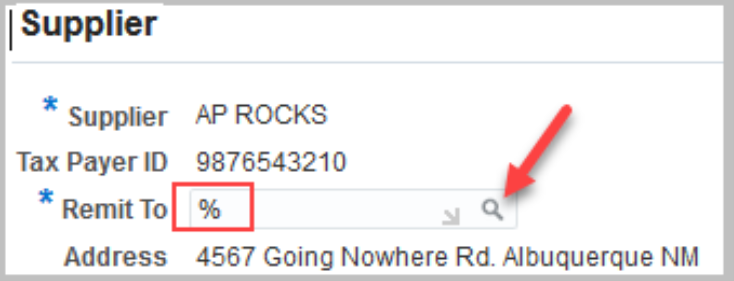
From the list of remit to sites, click the ‘Quick Select’ icon to select the correct remittance address. If your address is not listed and needs to be added, please see the guide on Managing Your iSupplier Profile or contact isupplier@sandia.gov for assistance.

![]() 2: Remit To Bank Account
2: Remit To Bank Account
Note: This field pertains to suppliers with a U.S. bank account. If your bank is located outside of the U.S., your E-Invoice will be paid via bank Wire Transfer based on the banking information (e.g. SWIFT code, IBAN, bank account number, etc) provided on your invoice image attached in section 9: 
If the Remit To address selected in section 1: ![]() is setup for EFT payments in our system, you will need to populate the Remit To Bank Account field with your U.S. bank account number by searching for and selecting your bank account number that is on file.
is setup for EFT payments in our system, you will need to populate the Remit To Bank Account field with your U.S. bank account number by searching for and selecting your bank account number that is on file.
To search for your bank account, click on the magnifying icon to display the Bank Account Number search screen.

When the search screen displays, click ‘Go’ to view the U.S. bank account associated with the Remit To address.

In the Results section, click the Quick Select icon to select the bank account.

If U.S. banking information is not found, then EFT banking information does not exist in our system for the Remit To address selected and you will receive a check payment. If you would like to add EFT banking information to a Remit To address, please complete the Electronic Funds Transfer (EFT) payments form and add the completed form as an attachment to your supplier profile. For more information, visit the Supplier Registration page or contact isupplier@sandia.gov for assistance.
![]() 3: Invoice Number
3: Invoice Number
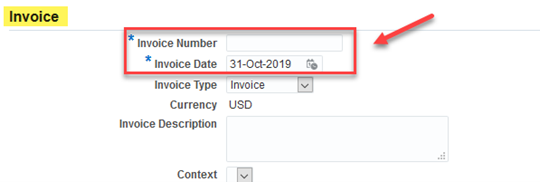
Enter your invoice number and invoice date (usually created from your accounting system).
![]() 4: Invoice Type
4: Invoice Type
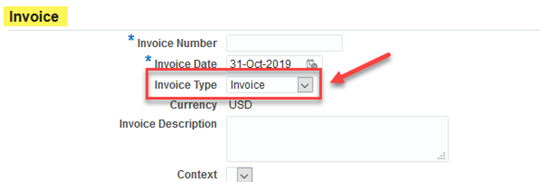
This value will default to “Invoice”. For credit memo, please select the “Credit Memo” option from the dropdown and enter negative quantity values on the PO lines in section 7: 
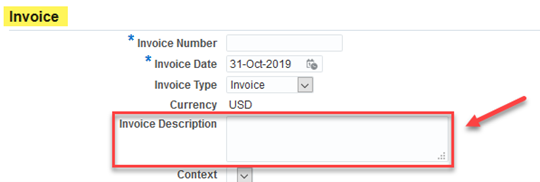
![]() 5: Invoice Description
5: Invoice Description
Optional field but recommended. This information will be reflected on your payment remittance advice.
![]() 6: Customer Tax Payer ID
6: Customer Tax Payer ID
This field will generally be auto-populated with data that displays “SYS11976”. **DO NOT remove this data in this field** this data pertains to Sandia National Laboratories.
If this field is not auto-populated, you can populate this information by either:
- Entering “SYS11976” in this field, or
- Entering the wildcard “%” and pressing the “TAB” key, this will auto-populate this information

![]() 7: Quantity
7: Quantity
Enter Quantity for each PO line.
If the amount in the “Available Quantity“ field represents a dollar value, then input the dollar value of the invoice in the “Quantity“ field.
If the amount in the “Available Quantity“ field represents a unit value (e.g 1 unit “Available Quantity“ at a “Unit Price“ of 50000), then input the unit value of the invoice in the “Quantity“ field and the dollar amount will automatically calculate in the “Amount” column.
You may need to enter a fractional unit value if you plan to incrementally bill a PO line that is setup as a unit value; or contact your Buyer and request the PO line setup be changed to “dollar value“ instead of “unit value“. If the field in the Available Quantity is blank and does not contain an amount, then it indicates the PO line is already fully billed.

![]() 8: Available Invoice Terms
8: Available Invoice Terms
Suppliers have the option to receive early payment by selecting available discounts that display in this section. Only discounts with early payment terms that are more favorable than the PO’s negotiated payment terms will be available for selection.
The supplier can select the radio button of each of the available terms to view the Estimated Discount and Estimated Payment to aide in determining which discount is preferred. The supplier also has the option to select ‘Use Current PO Terms’, which is the defaulted selection. If nothing is selected in this section, the defaulted PO terms will be used.

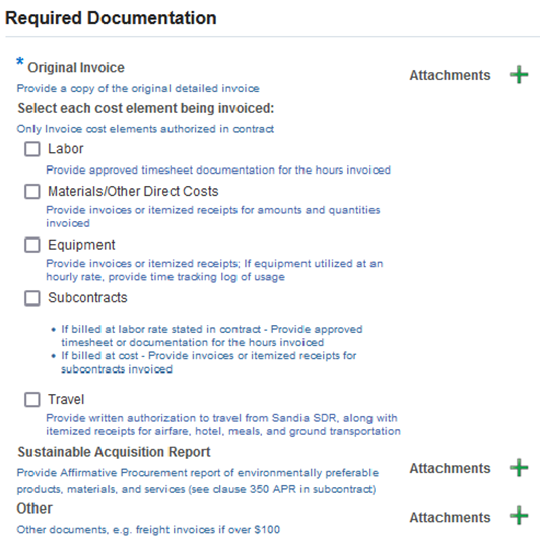
 9: Required Documentation
Note: It is mandatory to upload a copy of the original detailed invoice, as well as additional supporting documentation for each cost element being invoiced as authorized in the PO. If invoice and/or supporting documentation are not attached, delay of payment could occur.
It is required that original invoice documents, as well as any supporting documents authorizing the billed invoice amount, be uploaded with your E-Invoice. Oracle will allow attachment of most major file types.
To upload a copy of the original invoice document, click the plus (+) icon in the “Original Invoice” section; the ‘Add Attachment’ window will pop-up.
To upload supporting documents pertaining to specific cost elements billable on the PO, if applicable (e.g. labor, equipment, etc.), select the box next to the cost element being billed; the plus (+) icon will display for that particular cost element.
Likewise, to upload supporting documents pertaining to “Sustainable Acquisition Report,” if applicable, and “Other” types of supporting documents, click the plus (+) icon in those sections.
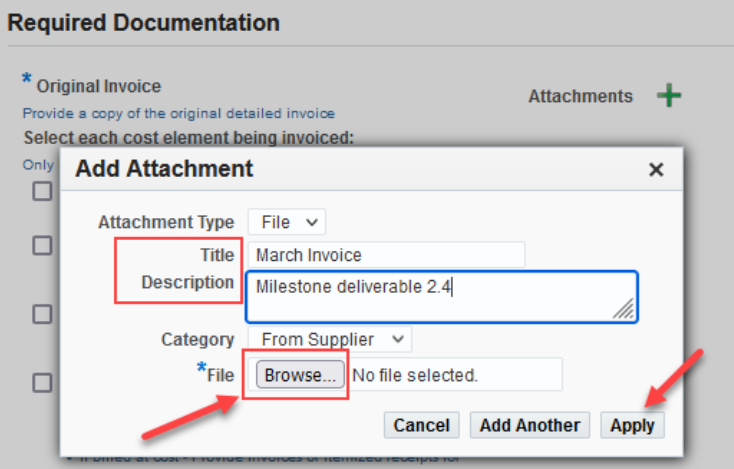
In the ‘Add Attachment’ window, add a title and description, if needed. Then click ‘Browse’ to find
and select the file on your computer. Then click ‘Apply’ to return to the ‘Details’ screen.
To add more attachments, click the plus (+) icon. To view/edit attachments, click the paperclip icon.
After inputting required information on the Details screen, verify information is complete and correct. Make necessary corrections on this page before continuing. Click ‘Next’ to continue to ‘Step 3 of 4’.
No input is required on this screen. Click ‘Next’ to continue.

1. Final Verification – This is your final opportunity to verify all information is correct. If information is correct click ‘Submit’.
2. If changes are required before submission, navigate by using the ‘Back’ button listed here; DO NOT use the back buttons on your browser, otherwise you might get an error message.
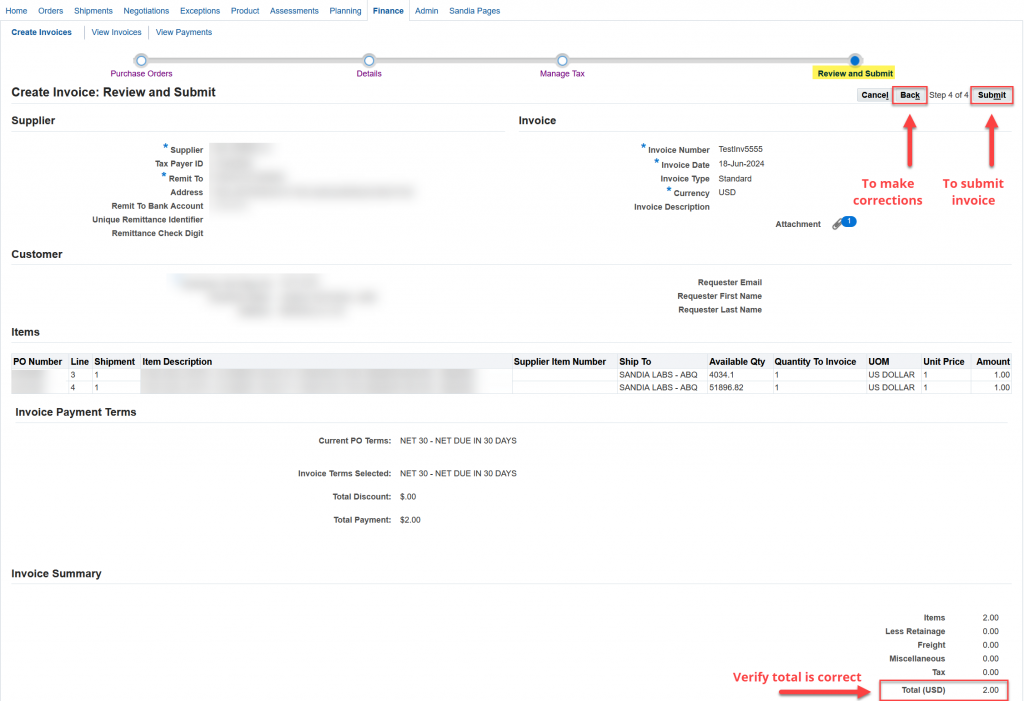
3. Once submitted you will receive a confirmation. If you do not see this confirmation message, your invoice has not been submitted.

PLEASE NOTE: Once submitted, the E-Invoice details, other than uploaded attachments, cannot be revised.
If you submitted an invoice in error, please contact einvoice@sandia.gov to request we cancel the invoice from the system.
To revise invoice attachments, please click the “Edit Attachments” tab above.
1. From the initial ‘Create Invoices’ screen, search for the invoice # you recently submitted and click ‘Go’ to execute the search. From your search results, click the ‘plus’ sign in the View Attachments column.

2. The Add Attachment window will display for you to upload your attachment. When done, click ‘Apply’ to save your changes and be directed back to the Invoice Actions Search page.


3. The ‘paperclip’ icon in the View Attachments column can be reviewed and will include your new attachment if it was uploaded successfully.

1. Click the ‘paperclip’ icon to be directed to the Add Attachment window.

2. When done viewing, updating, or deleting your attachment(s), click ‘Return to Invoice Actions’ to navigate back to the Invoice Actions Search page.

1. To view status of submitted invoices, click on the ‘Home’ tab and then click ‘Invoices’.
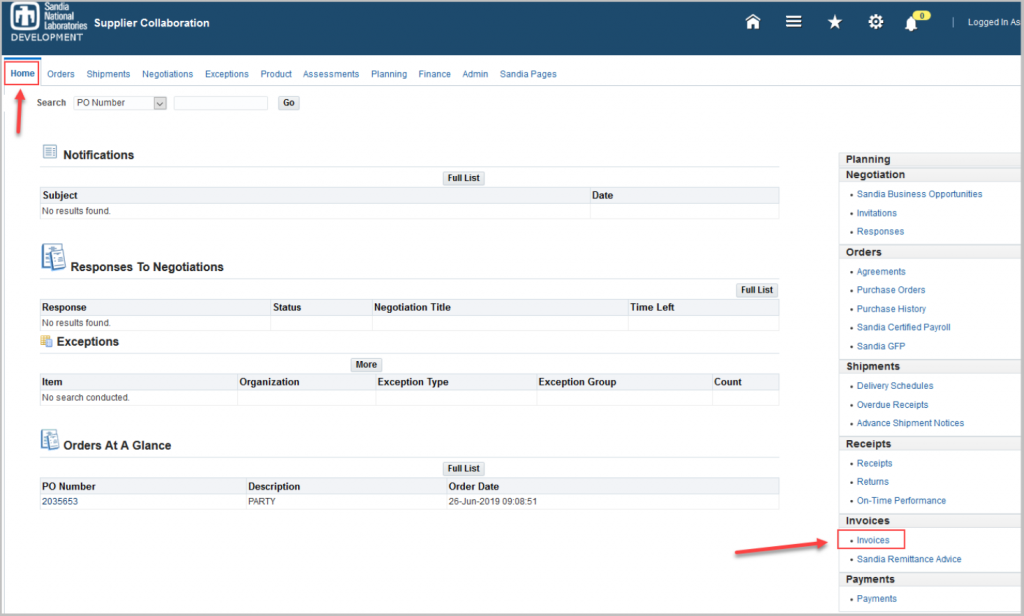
2. This will bring you to the View Invoices screen. In the Search section, search for your invoice using any of the search option fields and select ‘Go’. NOTE: Searching by invoice number is case sensitive and must be in the same format as originally entered when you submitted your invoice.

3. The invoice that you searched for will display. You can click on the Invoice link to receive additional information.
